The Zoostorm Freedom 10-270 is a small netbook PC. A friend asked me to have a look at the 10-270 as the machine would not boot. After doing all the usual checks I decided that I needed to scan the hard drive to see if it was infected. I tried the Microsoft Standalone System Sweeper, loaded on to a USB stick, but it could not find the Windows partition so failed to load. I then decided that the best way forward was to remove the hard drive from the netbook and attach it to my desktop machine where I would be able to scan it easier.
I turned the netbook over to try and find the cover that was hiding the hard drive. None of the covers underneath had a hard drive beneath them, oh dear! A quick Google led me to this page. So now I knew, to get to the hard drive you have to dismantle the netbook almost completely, oh deary dear!
So are you feeling brave? Then let us begin.
If your netbook is still in warranty then send it back and let them deal with it. If it's out of warranty and you have nothing to lose, have a go, it's the only way to learn you know!
Things you will need
Small Philips screwdriver, I bought this set from Amazon and the do seem quite good.
Small slot screwdriver, mine was in the same set as the Philips.
Good eyesight or a magnifying glass, or probably both!
Anti-static mat and wrist strap is always a good idea when working on delicate electronics.
Something to store an organize the screws that come out.
Method
2. Remove the Battery, two clips hold the battery in.

3. Remove the two screws that secure the two small panels above the battery.
4. Remove the two panels. Even with the screws removed you will have to ease the panels off as they are still held with small tabs of plastic.
5. You should now have a netbook that looks like this.

6. You now need to remove the 8 screws from the bottom of the netbook that are circled in red in the picture. The one on the left side is shorter than the other 7 so you will have to make sure you put the correct one back in this position when rebuilding the netbook.
7. Remove the aerial cable from the WiFi card. This should come of if you carefully ease it up with one of your flat screwdrivers. But be careful as it is a very small connector and looks like it can be easily damaged.

8. Turn over the netbook and open the screen. We now need to remove the keyboard. The keyboard is held in with 3 spring clips that are located above the F2 F8 and Print Screen keys. To release the spring clips insert a flat bladed screwdriver between the top of the F2 key and the plastic body of the netbook. If you are in the right place the clip should release and that part of the keyboard should pop up a little. Repeat for the other 2 clips.

9. Once the 3 clips are released the top of the keyboard should be free. The bottom of the keyboard is held in with 3 tabs on the keyboard. However you need to release the ribbon cable from the motherboard before fully removing the keyboard. You should see that there is a grey plastic bar on the top of the ribbon connector. This grey plastic bar needs to be rotated upwards to release the ribbon cable.
10. Once the keyboard is removed you will then need to release the smaller ribbon cables that are for the touchpad and the LEDs. They are the same type of connectors as the keyboard and require the grey plastic bar rotating upwards like the keyboard connector.

You can see the keyboard connector between the 2 smaller red circled smaller connectors.
11. You now need to remove the plastic covers that are covering the screen hinges. You need to use a flat screwdriver to ease the front of the cover up. When the front is eased up you can tease them off at the back as well. The covers look the same but they are handed, there is some plastic underneath that means that you have to make sure you replace them in there correct place.

12. You now need to remove the 2 connectors, 1 by each hinge, that come from the screen and connect to the motherboard. These connectors DO NOT have the grey plastic bar and are just push fit together. Tease them apart carefully trying to keep them square as they come apart so as not to damage them. Lift the sticky tape and lift the connector and wiring clear.


Then you can remove the two screws indicated by the purple arrows, and carefully remove the screen. (Thanks Ruth)
13. Next remove the 6 screws from under the keyboard.

14. Turn the netbook over and look in the battery compartment. You will see 3 plastic clips that need to be released. I used a slightly larger flat screwdriver and using a twisting motion released the clips.

15. With the 3 clips released the top of the netbook case should come off. You may have to run a finger nail, or similar between the two halves of the case. With the top of the case removed you should see the following.
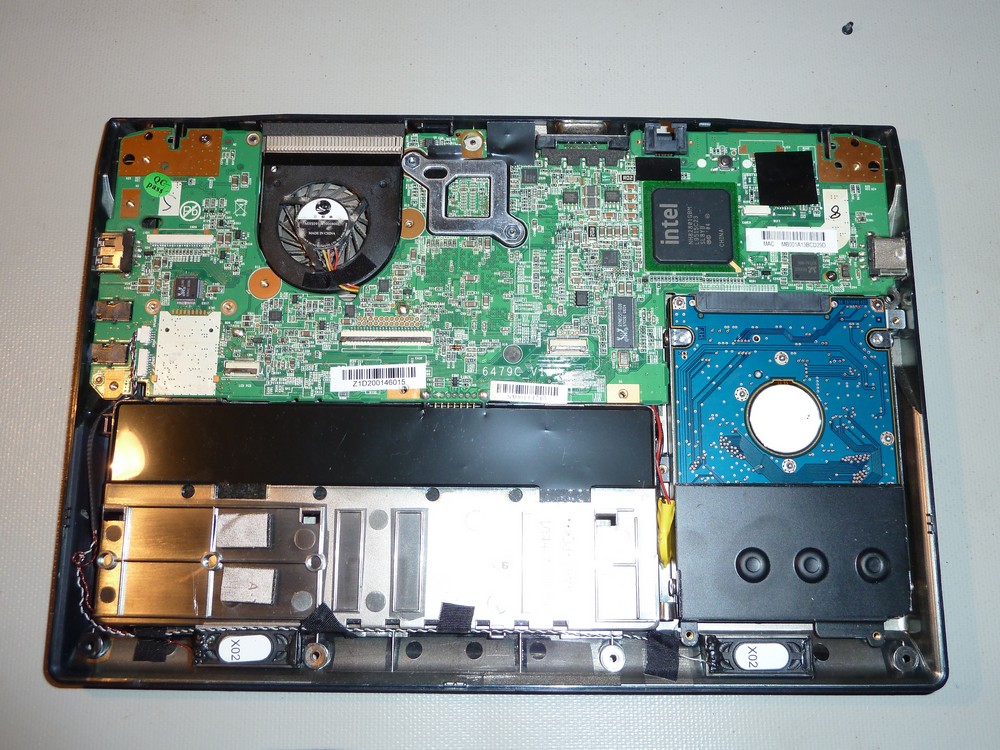
16. The hard drive is located in the bottom right hand corner. It is held in with 4 screws.

17. After removing the 4 screws, lift the black end of the hard drive up and withdraw the hard drive from the motherboard connectors.

So you now have the hard drive removed ready to replace or scan in another PC. When you have done what you need to do, the refitting and rebuilding of the netbook is the reversal of the removal. However there are few things to watch for:
The yellow package to the left of the hard drive in the last photo (I think it is the CMOS battery) has wires connecting it to the motherboard. Make sure you don't trap the wires when replacing the hard drive.
Make sure you put the correct screws in the right place. You did keep them all separate and note where they came from, didn't you?
Be careful when replacing the screen connectors they are rather small. The wires connecting them are also thin and easily damaged. Remember to put the sticky tape back on to hold the wires down so they don't get trapped.
The ribbon connectors for the keyboard, touchpad and leds can be a little tricky. Make sure they are correctly seated before pushing the grey bar down.
Don't forget to reattach the WiFi cable. You need to route from the top of the netbook after refitting the screen through the hole just to the left of the bigger screen connector. Take care when refitting the cable to the WiFi card that you have it aligned correctly.
So what happened to the hard drive in this machine?
Well after attaching it to my desktop and running the Hitachi diagnostics software on it, the result was the diagnostics were telling me that there was a hardware error due to "excessive shock". So it looks as though it's a new hard drive, but my friend does not have a Windows reinstall disk and did not do any backups of the operating system, because there is no optic drive, when they bought the netbook. So it might be getting a version of Linux installed on it.
Update
CMOS Battery
There have been a few people posting in the comments asking about the CMOS battery. I did not have to take the battery out when I was dealing with the hard drive, so I was a bit in the dark. Lucky for us, Andy has just replaced his and has posted some extra details:
I just fitted a new one, zoostorm customer services charged £6.60 and it arrived overnight.
It has a keyed plug already fitted.
You don't need to take the hard disk out but you need to get to that stage then remove the plug from top side of the motherboard. If you follow the wired you can see the plug/socket in the corner of the motherboard.
It's a fiddle but you can locate the replacement plug over the socket and lever it into position.
It is keyed so nothing to worry about.
Andy
So it looks like the battery comes as a complete unit including the wire and plug to connect it to the motherboard, it is plugged on the motherboard not soldered and they can be obtained from Zoostorm Customer Service http://www.zoostorm.com/ContactUs.aspx
Update Number 2
CMOS Battery Again
Andy McDougall posted a comment saying that he had re sited the CMOS battery so that it would be easier to change it the next time it failed. That's a great idea but I also liked the fact that he used some rigid plastic from a supermarket meat tray to insulate the PCB from the re sited battery and holder.
He has sent me some photos and info which I have reproduced below. He has in effect moved the CMOS battery from one side of the notebook next to the hard drive to underneath the cover for the Wi Fi card as shown by the red circle in the picture below. He has removed the original battery holder and extended the wires to the new re sited battery holder.

Hi Malcolm,
Attached are the photos I took during the final stages of the battery fix. the first just shows the extension wires linking to the chopped-off ones from the original battery - soldered but not yet sleeved. The second is the holder sitting on the plastic separator, unfortunately a bit skew-wiff and not terribly visible as it is transparent(ish). Conveniently it was possible to cut it with a bit of a flange below the edge nearest to the wifi sub-board, which helps to leave a little air gap above the packages underneath. That's just a bit of magic tape holding it steady.


I can strongly recommend Gleave and Co (http://www.gleaveandco.com) for anyone who passes through Farringdon in London, it is only 5 minutes' walk from the Underground and has a dizzying range of button cells at sensible prices, for example £1.20 for a quality Renata CR1225. Beware that they close at 3pm though.
All the best, Andy
Update Number 3
More CMOS info
A good point from Brian Westlake in the comments, if you are going to replace the CMOS battery with an identical one and not move it like Andy did above, when you remove the old battery, holder and wiring make sure you note which way around the connector is as it is then easier to replace when you know which way around it fits.
Malcys, very helpful thanks!
ReplyDeleteThanks for this...had to replace my CMOS battery and this was invaluable
ReplyDeleteAlastair,
DeleteWould you mind telling me where you got your CMOS battery for your Zoostorm Netbook, as all the online sources are not clear on what type to select.
Regards,
Geoffrey
geoffr555@yahoo.com
Thanks for the linkback to fschooliascoff.com - Nice to see someone add some pictures for the whole thing - I lost mine off my phone soon after writing the article.
ReplyDelete- John
any one needs a CMOS battery call zoostorm on 0844 800 6183 and ask for the 10-270 cmos battery they are £6.60 from zoostorm and that should sort any time and date issues out.
ReplyDeleteDrivers for the Zoostorm Freedoms can be found below:
For 10" Display Settings - Intel 965M
http://downloadcenter.intel.com/confirm.aspx?httpDown=http://downloadmirror.intel.com/18223/a08/win7_1512754.exe&lang=eng&Dwnldid=18223&ProductID=2800&ProductFamily=Graphics&ProductLine=Laptop+graphics+drivers&ProductProduct=Mobile+Intel%c2%ae+965+Express+Chipset+Family
WLAN drivers
http://downloads.zoostorm.com/drivers/netbook/Freedom%20XL/WLAN/RT3090.exe
For On-board Lan:
http://downloads.zoostorm.com/drivers/desktop/Common_Drivers/lan/realtek/Driver_Win7_7037_01202011.zip
Audio
http://downloads.zoostorm.com/drivers/desktop/Common_Drivers/audio/Realtek/Vista_Win7_R257.zip
Thank you so much for this page...has helped me a lot!
ReplyDeleteKirsten
Wonder if you can help, my daughter has a Zoostorm netbook and there is no display when switched on, either on the built in screen or an external screen. The power and battery lights at the front of the netbook come on, but none of the lights at the back under the screen. I have checked all motherboard ribbon cable connections and also removed and checked the hard drive for errors externally. Any tips?
ReplyDeleteThanks Gordon
That doesn't sound too good.If there is no display either on the built in screen or an external monitor, it points to a problem with the graphics chip.
DeleteI am assuming, from what you say, that there is no display at all even when the netbook is booting. If there is a bios display when the netbook boots,or you can get into the bios (by pressing the f2 key whilst booting) but no display when Windows loads then it would look like a driver/virus issue.
If you think that it could be a driver/virus issue then you will need to use a Linux rescue disk (on a USB memory stick as there is no optical drive) to try and remove the virus. You can also use the rescue disk to recover files from the hard drive if she did not have any backups, (why didn't she have any backups?).
If you think that it is a hardware issue it is possible that you could "reflow" the motherboard. Search the internet for "reflow motherboard laptop". This is an option of last resort!! Reflowing the motherboard involves heating the board in an oven to get the solder on the board to melt and restore any broken connections. These connections can get broken because the device overheats. Laptops (bad name really) and netbooks can suffer with overheating because people use them on their laps and stop air flowing through the machine or they get blocked with dust.If it's really broken to that extent you are not going to do any more damage. You do need to strip the netbook right down to get the motherboard out.
If all else fails and you can't repair the graphics chip, if that is what the problem is, and you don't want to change the motherboard,then you have to admit defeat. However if you have stripped the netbook you will have the taken the hard drive out. You can then, assuming the drive is good, mount the drive in an external USB drive caddy recover the files on it with another computer and then you have the perfect back up drive for the future. So the netbook may not work as a netbook any more but you will have re-purposed at least some of it and kept some of it out of landfill.
Thanks for this guide...I have now replaced my CMOS battery with no tears or tantrums. My only comments to add - you need to remove the screws holding the screen to the base which are pictured in your photos but not included in the instructions. The hinge copvers were easier to remove at the back from the side of the hinge rather than right at the back.
ReplyDeleteI got my battery from Zoostorm customer services for £6.35 incl postage, although the chap on the end of the phone seemed quite concerned that a mere woman would attempt this...'are you SURE madam??' Job done - thanks for the guidance.
Ruth
Oops. Yes it looks like I missed a step out. I have now amended the photos and text say to remove the screws and then the screen.
DeleteWell done for changing the battery, and as for being a "mere woman" - how dare they. If only more people, men and women, would investigate simple repairs to items and manufacturers made service manuals more available, we would not throw away so many items that could be easily repaired.
It does require a bit of confidence and common sense to delve into a broken device and attempt to repair it. I think that confidence starts at a young age. I remember as a kid taking things apart to "see how they worked". When I was a bit older I was able to put them back together. When I was older still I could put them back together and they would work!
Malcolm
This comment has been removed by the author.
ReplyDeletethanks very much for this had to change the battery and this was invaluable
ReplyDeleteYour welcome Andy.
DeleteAre you able to help one of the other posters as to whether the CMOS battery is a plug in or solder in?
Malcolm
Nice to note the work you have put into this, thank you, I have a problem with the one I am repairing for a friend and have been in touch with zoostorm,who put me in touch with yourself as I need to change the cmos battery, you show this in the last photo, can you tell me if this is pluged into the motherboard or soldered onto it?
ReplyDeleteHi John.
DeleteI'm sorry but I don't know if the CMOS battery is plugged or soldered, I didn't need to take it out on the one that I had to bits. However it looks as though several people have changed their CMOS battery see posts above from Alaistair, Robbie, Andy and Magenta, with one they bought from Zoostorm. So if I had to make a guess, and I could be wrong, I would say that it is a plug in one. I am guessing that the CMOS battery that folks have been buying from Zoostorm are the complete deal with the battery inside some shrinkdown and with the wires coming out ready to hopefully plug into the motherboard. Magenta paid £6.35 for her battery, which would seem rather expensive for just a button cell, so I am guessing it is the battery inside some shrinkdown with wires and hopefully a plug.
If you find out please feel free to post back as it will help others in a similar situation.
Malcolm
Sorry not to get back sooner, when I final stripped it down, I found that the battery is plugged onto the mother board, it was very fiddly and tight to get at as you have to press the frame slightly apart from the board to get at the plug , not to difficult to get out but a pain to line up correctly to get it back in, I eventually managed it with a very long pair of tweezers.
DeleteAm now trying to get info on changing RAM on an Acer Aspire one D255
Very useful - Thanks.
ReplyDeleteOn the cmos battery.
I just fitted a new one, zoostorm customer services charged £6.60 and it arrived overnight.
It has a keyed plug already fitted.
You don't need to take the hard disk out but you need to get to that stage then remove the plug from top side of the motherboard. If you follow the wired you can see the plug/socket in the corner of the motherboard.
It's a fiddle but you can locate the replacement plug over the socket and lever it into position.
It is keyed so nothing to worry about.
I hope this completes the story.
Regards
Andy Calver
Thank you very much, this is a great guide, I also needed to change my CMOS battery, but after calling customer services I was told they didn't have any batteries, and they were on back-order from China and would be at least another 2 weeks, as I am a little impatient I decided to use a workaround, anybody with the ability to use a soldering iron can make their own battery, the original CMOS battery I removed was a 3 Volt Lithium CR1225 button battery shrink wrapped with a lead and 2 pin plug, I decided to make my own, you just need to buy a button cell battery holder with soldering tabs of the same physical size, and a new battery and cut the wired plug from the old battery and resolder the wire/plug to the new battery holder you purchased , I found a holder on ebay for £1.38 inc postage http://www.ebay.co.uk/itm/300728420016?ssPageName=STRK:MEWNX:IT&_trksid=p3984.m1497.l2649, and a pack of 6 CR1225 Batteries was £0.49 from my local pound shop, my total cost was £1.87 and it works great, I also made the wires longer and re-situated the battery holder in a different place, namely under the removable panel on the underside where the Wi-Fi card is situated, so now in futre when the battery goes flat I can just open the cover and pop out the old battery and pop a new one in without having to strip the whole netbook, also, for those people changing the CMOS battery, it is easier to push the plug back in if you remove the hard drive.
ReplyDeleteForgot to say, dont forget to apply electrical tape around the battery holder and terminals and any other resoldering you do otherwise it will creat an electrical short on the motherboard, and you do so at your own risk, don't be blaming me if you something goes wrong ;)
DeleteThanks for that Adam, great information!
DeleteMalcolm
Thanks for posting this Malcolm. I had to replace a BIOS battery, and your guide was invaluable.
ReplyDeleteCheers, Paul
wow what a great site, need to replace cmos battery and will tackle this wiyh renewed confidence. many thanks geoff
ReplyDeletehi again, i have just phoned zoostorm for battery but they are out of stock and not getting any soon, told me to try amazon or ebay. lol
ReplyDeleteOh dear Geoff, it looks like everybody is changing their CMOS battery on their Zoostorm Netbooks! Have you seen the post from Adam Thrower? He managed to change his battery using a new battery holder and a soldering iron.
Deletehi again, bought new cr 1225 battery from local watch shop £3 can get them on ebay £1.45 or £1,80 for 6 cut off spade coonnectors from old battery and resolder the bared wires back onto the new battery, make sure you remembered which colour is pos and neg. wrap with a bit of electrical insulation tape and refit. don't use too much solder or battery wont slide into its hiding place.
ReplyDeleteHi,
ReplyDeleteHas anybody has an issue of the machine not post booting after the CMOS battery change? I have stripped it down twice now and only the battery and power light come on when switched on, and no other activity.
I have re-connected all the cables and re-seated the RAM.
Any ideas?
Mikki
Hi Mikki
DeleteDid you buy the replacement CMOS battery from Zoostorm or did you make one up yourself? If you made it up yourself are you sure you have the polarity the right way round? Are you sure the netbook is not booting or is the screen not working? I am pretty sure there is a VGA connection on the netbook, try plugging in an external monitor. If it boots there is a problem with the screen connections. The wires for the screen are thin so one could have been damaged. Does the power button cause any LEDs to come on when pressed? You haven't left any screws inside shorting out some connections?
Let us know how you get on.
Malcolm
Hi There
ReplyDeleteJust wanted to add my thanks for the excellent stripdown and re-build of the Zoostorm. Like most others CMOS battery died and Zoostorm had no spares,so I went down the Ebay route. Followed instructions, and Zoostom now back to remembering the date and time. Stuck replacement battery in same easy access panel as wireless card, to aid future replacement.
I am well impressed by anyone who manged this themselves ,as I needed extra pair of hands from teenage son a few times during process. Once again, many thanks for excelent procedure.
cheers
Hi,
ReplyDeleteI have a Virgin VM F10,Freedom, which will not load because I inadvertently deleted some files which were needed. Is this the same as the Zoostorm, as it looks and sounds very similar.
If it is, do you know how I can load up an operating system?
Regards
Geoff Wood
Hi Geoff, Yes it could be the same netbook rebadged for Virgin. As with all netbooks they don't come with a CD/DVD drive internally. If you have a back up disk of the operating system you would need an external CD/DVD drive to reload the OS from. If you don't have a back up disk of the operating system, and I'm guessing that it's Windows XP, you could try downloading a version of Linux. You might be lucky and find that it would boot from a USB memory stick to load Linux, or again you might have to use an external CD/DVD. A good place to start venturing into the world of Linux is http://www.linux-netbook.com/ If you have never played with Linux before be prepared for a reasonably steep learning curve and remember that Google holds the answers to most questions
DeleteI've just replaced the cmos battery in two laptops but neither are keeping the time n date still. Is it worth reopening them up and pressing the cmos reset button? I think I saw one on the mainboard. Had to create my own battery gubbins thanks to zoostorm no longer selling them at all!
ReplyDeleteHi M
DeleteI would double check whilst you have them open that you have the batteries the right way around and I would also check the voltage of the batteries. If you look at one of my other posts on the "ASUS X52F random chnages in date" you will see that the "3v" battery I took out measured 3.17v and the new one measured 3.39v. So you can see that it does not take the battery to lose much in voltage to start playing up.
They were BR1225 instead of CR1225's, CR's were ordered but the seller sent BR's :| They're Energizer's . Could that possibly be the problem? I have the plus (red) on the inside (the side with the serial label) and minus on the outside. I forgot to check what way they it came out but luckily had another one to do that I just copied that. Although that one has the same problem.
DeleteBR1225s and CR1225s are virtually identical. However according to this site
Deletehttp://www.jgthomas.com.au/static/lithium%20batteries.pdf
"The difference between CR series and BR series in the lithium range is CR batteries provide higher voltage during the first half of discharge
and better overall current capability"
So there could be an issue with the BR1225s as they don't provide as high a voltage as the CR cells.
The CR cells that I buy are usually 8 for a pound so they are never going to be really high quality but they always seem to work, so it could be that the BR cells are the issue but there's only one way to prove and that's to change them for CR cells.
I have not had the cell holder to bits for this netbook so I can't comment on which way around the button cell should fit, but I would think that the red lead should ultimately be connected to the side of the button cell with the writing on, the give away is that side of the cell should have a + on it.
I meant where the wires plug in to the board rather than where it connects to the battery, it can be seen if you take the memory flap off. I may as well try a CR I guess. Would be nice if zoostorm still sold them. Thanks for your help though.
DeleteMany thanks for the info. I have successfully managed to change the CMOS battery with these instructions. I needed to take the hard drive out to locate the little plug where the CMOS battery fits in. but all OK. Thanks again
ReplyDeleteThank you, Malcy, for this useful guide, which I've just used to replace the exhausted CMOS battery in my three-year-old Freedom 10-270 netbook.
ReplyDeleteZoostorm customer service (tel 0844 800 0730) now charges £9.00 for a CMOS battery, including first-class postage.
At step 12, above, one needs to pull the plug end of the wireless arial up through the hole in the chassis before removing the screen (the other end of the arial goes inside the screen cover).
I broke two small plastic retaining tabs whilst disassembling the netbook (one in the battery compartment (step 14), one when separating the case halves in the next step). I superglued them back on, but this disassemby procedure is clearly something that one can't repeat too often.
Plugging the new CMOS battery in was surprisingly difficult, I had to bend the circuit board slightly to get good access to push it in firmly.
Many thanks for this set of instructions. We have three of these netbooks in the house and all of them had batteries that died in quick succession. Had started opening them up to try and work out where the battery was, but would have never have made it without these clear instructions.
ReplyDeleteOne tip, I found that when removing the brackets covering the screen joints, it was easier to remove the back first, and rather than pushing a screwdriver underneath the clip, putting it between the two sides of the clip from behind and gently teasing them apart worked well.
Many thanks for this invaluable blog, I'm sure I would have damaged something irreperably trying to dismantle the machine without your guidance. As Adam Thrower has already pointed out, there is plenty of room under the wifi card access hatch for a re-sited battery and holder. I used a square of rigid plastic (part of a supermarket bacon pack!) taped to the wifi card to ensure the terminals stayed clear of the various surface mount gizmos underneath. Photo available if you would like one.
ReplyDeleteWonderful guide thank you! Needed to replace my CMOS battery, and took the opportunity to change the hard drive to an SSD one. The machine now flies (already upgraded the memory to 2GB) - my netbook is now what netbooks were supposed to be, a fast, portable and energy efficient machine, all thanks to your guide without which I would never have attempted these upgrades.
ReplyDeleteMany thanks for the instructions.
ReplyDeleteEven a ham-fisted mech engineer like me managed to sucsessfully replace
the CMOS battery following them.
Only point I would add is when disconecting the old battery from the motherboard,
try to note which side the key is on the connector;
saves a lot of time when you're trying to fit the new one.
Thanks Brian that is a good point.
DeleteExcellent script Malcolm, thank you. It enabled me to replace my hard drive and CMOS battery without a hitch.
ReplyDeleteNice post with awesome points! Can’t wait for the next one.
ReplyDeleteAcer - Aspire V5 Series 15.6" Touch-Screen Laptop - 4GB Memory - 500GB Hard Drive - Silver (V5531P4693)
Acer - Refurbished - 15.6" Aspire Notebook - 4 GB Memory - 500 GB Hard Drive (E1-531-10004)
Hi, I have followed your instructions and they have been fab but the cmos battery wire was not in place it was just hanging, Is there any way you could show me where it is supposed to go please, thank you
ReplyDeletesorry it was on the zoostorm freedom 10
ReplyDeleteHello. This info is fantastic. I have zero experience of repairing computers but was confident enough to use your site to attempt to replace the cmos battery in my zoostorm. Stripping the machine down and replacing the battery went without any problems, however I am struggling to refit the screen connectors as they are so small. Do you have any more tips or advice about the best way to refit them
ReplyDeleteThanks
Jeff Hodgson
I've replaced my battery following you guide I've put my machine back together now it won't boot up, the battery light flashes red and fan doesn't start, no system beeps
ReplyDeleteZoostorm Freedom 10-270 BIOS
ReplyDeleteHello
Have you got the rescue disk for this netbook please? I could use a copy. I especially want to flash the BIOS as I suspect that I have a rootkit as the pagefile.sys keeps getting a virus and I can delete the file in Linux, with Sophos, but it soon comes back again when I boot into Windows again. Obviously I can send you a fiver for a copy of the rescue disk if that would be OK please?
I found the blog on replacing the CMOS battery very useful a couple of years ago. Thanks. What a job though!
Best wishes.
John Chinn
Hi John
DeleteSorry but I don't have a rescue disk for the Zoostorm netbook as it was not mine. Have you thought about putting a version of Linux on it instead of Windows? I find that Linux Mint works quite well on older hardware.
Malcolm
I wiped mine and put Lubuntu on it....its so much better then the bogged down windows 7. It is now a totally usable machine again!! The only issue i've had is the sound and screen brightness not being adjustable via the Function button....if any one has a solution.
ReplyDeleteJust followed above but using standard 3v battery from hardware shop, reconnected leads to this after feeding the leads with tweezers through to compartment where ram chip is + insulating layer from offcut of husehpld packaging, no soldering or new connectors needed, left original plug connected to motherboard.. replaced hard drive with SSD and now can access battery through removable panel on base.. thanks for above instructions, very thorough and helpful... cant work our why you'd make battery so inaccessible though Mr Zoostorm!
ReplyDeleteSteve
This comment has been removed by a blog administrator.
ReplyDeleteI like your info Malcy, very informative and to the point. However, I'm thinking about changing my Freedom 10 270 HDD for a SSD, the thing is, what capacity SSD would I be able to put in? M
ReplyDeletehow can download this fucking bios..
ReplyDeleteone time, smoke came out from the hinge near the escape key, then the screen went blank. I was able to use it by connecting to a PC monitor. Can you do a step by step instruction of replacing the lcd screen?
ReplyDelete
ReplyDeleteشركة درة البيت
تصليح مكيفات دبي
شركة مكافحة حشرات دبي
شركة مكافحة حشرات راس الخيمة
شركه مكافحه حشرات الفجيرة
شركه مكافحه حشرات عجمان
شركات مكافحة الحشرات في الشارقة
Totally loved your article. Looking forward to see more more from you. Meanwhile feel free to surf through my website while i give your blog a read.
ReplyDeletewelcome to Home With Cavalier King Charles Spaniel Puppies
where to buy Charles Spaniel Puppies
King Charles Spaniel Price
In King Charles Spaniel USA
King Charles Spaniel puppies ready for their forever homes
perde modelleri
ReplyDeleteNUMARA ONAY
Türk telekom mobil ödeme bozdurma
HTTPS://NFTNASİLALİNİR.COM
Ankara Evden Eve Nakliyat
trafik sigortasi
Dedektör
web sitesi kurma
aşk kitapları
SMM PANEL
ReplyDeleteSmm Panel
iş ilanları
İnstagram Takipçi Satın Al
hirdavatciburada.com
Https://www.beyazesyateknikservisi.com.tr/
servis
tiktok jeton hilesi